Tuesday, 17 January 2017

Review: Missha Geum Sul First Essence Booster

I bought this from my last trip in Korea after getting a sample of it. It was quite an impulse purchase as I didn't plan on buying this at all unlike the other products i got there. 
I was attracted to the texture of it as well it's herby smell and it seems like a premium line from Missha. Plus it was a good deal 2 full size bottles including full size day creams, travelling size of boosters and eye creams for the the price of 1. Seriously Korea, you are killing me.
I took the plunge resulting to 35kg luggage *though there were other products included, most of these essence and booster are in glass bottle. So you can imagine* Fast forward now I have finish 1 bottle of the booster and eye creams and i give away the day cream as I am not interested.

Bits of Missha claims (from MISSHA US website)
The highly-concentrated oriental Booster is for the very first step in your skincare regimen as it awakens your skin. It helps control oil-moisture balance, soothes to improve skin texture, nourishes, vitalizes, and purifies. Also provides wrinkle repairing and whitening benefits.
Made with wild ginseng, deer antlers and Reishi mushroom fermented and extracted based on gold. Contains Ginseng Water to nourish and moisturize dehydrated skin. Also contains Ginseng from Geumsan, Korea, which is famous for the best quality of ginseng around the world.
Sounds promising right! 

Ingredients:
Phellinus Linteus Mycelium Extract/Ginseng Root Ferment Extract FiltrateGlycerin, Panax Ginseng Root Extract, Ethanol, Sodium Hyaluronate, Polyglutamic Acid, Arbutin, Propanediol, Betaine, Ginseng Water, Chrysanthellum Indicum Extract, Acorus Gramineus Root/Stem Extract, Ipomoea Hederacea Seed Extract, Codonopsis Tangshen Root Extract, Pinellia Ternata Root Extract, Eucommia Ulmoides Leaf Extract, Daemonorops Draco Extract, Astragalus Membranaceus Root Extract, Angelica Gigas Root Extract, Rehmannia Chinensis Root Extract, Glycyrrhiza Glabra (Licorice) Extract, Poria Cocos Extract, Zizyphus Jujuba Fruit Extract, Eugenia Caryophyllus (Clove) Flower Extract, Foeniculum Vulgare (Fennel) Fruit Extract, Scutellaria Baicalensis Root Extract, Ophiopogon Japonicus Root Extract, Houttuynia Cordata Extract, Ginkgo Biloba Leaf Extract, Coix Lacryma-Jobi Ma-yuen Seed Extract, Ardisia Crispa Extract, Acanthopanax Sessiliflorum Bark Extract, Triticum Vulgare (Wheat) Flour Extract, Zingiber Officinale (Ginger) Root Extract, Velvet Extract, Ganoderma Lucidum (Mushroom) Extract, Honey Extract, Bacillus/Prunus Armeniaca (Apricot) Seed/Artemisia Annua Extract/Phaseolus Angularis Seed/Glycine Soja (Soybean) Seed/Wheat Bran/Xanthium Strumarium Fruit Extract Ferment Filtrate, Asparagus Cochinchinensis Root Extract, Cynanchum Wifordi Root Extract, Lycium Chinense Root Extract, Panax Ginseng Root Extract, Polygonum Multiflorum Root Extract, Sesamum Indicum (Sesame) Seed Oil, Theobroma Cacao (Cocoa) Seed Extract, Mineral Salts, Gold/CI 77480, Hydrogenated Lecithin, Carbomer, PEG/PPG-17/6 Copolymer, Glyceryl Acrylate/Acrylic Acid Copolymer, Glyceryth-26, Sucrose Distearate, PEG-60 Hydrogenated Castor Oil, Bis-PEG-18 Methyl Ethyl Dimethyl Silane, Hydrolyzed Hyaluronic Acid, Dimethicone, PEG-2M, Cellulose Gum, Arginine, Adenosine, Benzophenone-5, Disodium EDTA, Phenoxyethanol, Chlorphenesin, Caprylyl Glycol, Ethylhexyl Glycerin, Fragrance


I have to admit this is one of the longest ingredient list i encountered on a product I used... it does scare me a little. I do like that Ginseng is the first on list, and we got Sodium Hyaluronic and Arbutin up in the list as well. Lots of root extract which really give that oriental medicinal vibe or smell... although they do have Fragrance last in the list. Given the many extract I still wonder how much are really in it, especially when there is glycerin 2nd in the ingredient.

Personal Experience:
Colour, Texture and Packaging:
It is a water gel texture in light amber with gold specks infused through. It  does make me feel lush. Given the price, which was quite expensive, more so than the more popular Time Revolution line, it has to feel great.
The bottle is nice enough to display on vanity but the cap looks a bit tacky to me, lol. But the pump works great and it is an actual glass bottle, so quite heavy to travel with.


However, while this does feel good and I like the light water gel consistency... after a while I started to hate those gold specks. Since my skin is quite textured... I noticed some of the gold specks settle in my acne scars... I don't think the gold really does anything...
I heard about all these 24k gold facials etc... but in this case it does nothing... or maybe it just not obvious.
At first I use to wear this before serum, after acid tone/ mist... I think it works well in combination with my brightening serum... but on it's own it really does not do much other than hydrating and softening. But I guess in Missha defense it does what it supposed to do? Prep skin for the products to be absorbed better. I can't help  but started thinking it's basically a mix of ginseng extract and glycerin... which not to bad but not worth the price.

I don't want to say this product is bad, but I kinda felt slight tingling and irritating whenever I wear this, it might be the gold or the actual liquid itself. Overall it making me less excited to use especially when I have other better essence. But I just kept using so I can get rid of it. On the bright side it does not cause any bad reaction to my skin or flare up my acne.
Now I change to use after serum instead just before moisturizer which felt bit better. 
Another reason I change to after serum is because of the long list of ingredient and its texture. While it is quite watery,  the consistency is almost as thick as my current serums and my serums have shorter ingredient list so to be safe and wanting to get most pf my serum I believe it might be better to be worn after serum.

I even put on after moisturizer just so that I can finish it asap. But I think it's good under foundation especially the matte finish one. It gives an extra moist glow.

Neverthelesss it is still quite a dissapointment as a skincare product. Although I do notice a couple UK beauty blogger use it, so I am actually waiting for their review.

Overall I give it a 2/5.
Even if it is available to buy online in the UK, I will not repurchase.


Saturday, 12 November 2016

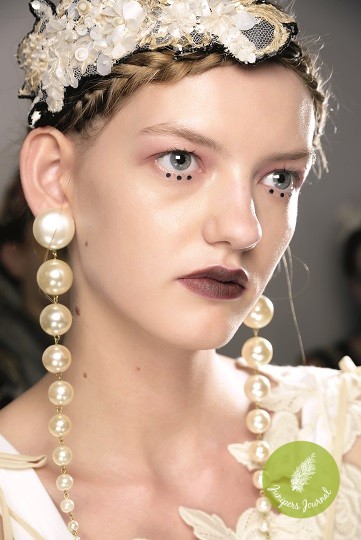
Makeup look - Inspired by Antonio Marras ss 2016

Of all the videos I like to watch on youtube, I like to watch backstage videos and makeup looks from the runways, thank you to Fashion TV.  So back in spring which was ages ago I was really awed by this makeup look from Antonia Marras SS2016. I guess this look was quite popular that I found another video by Adversus interview the MUA


This look was design by one of my favourite MUA, Tom Pecheux with MAC.
So I thought I share this inspired look which I adjusted into my style. He says you can take everything from the look and he's quite right. That is what I love Pecheux, he's adventurous but still chic.

Pic from junipers journal

Pic from Image.ie


The look is not exactly too out of the world. You still can sort of take one feature either eye or the lip, dots without dots.


 Okay.. I tried... lol. But you what I learnt, I learn to like pink and red on my eyes... usually I tend to  avoid, but thanks to this, I'm open to pink. *Hello Anastasia Modern Renaissance Pallete!*


Face:
Foundation as usual and  contour minimally. No blush.

Eyes:
Eyebrow is my usual and maybe a bit more minimal.
Eyes following true to the look following facechart would be just blush very soft warm pink
blend up to crease with  with silver pigment in the centre. Then 3 black dots on the bottom under the pupil/ iris.


I used MAC Paint Pot is Soft Ochre and contour slightly with MAC cork. Swipe softly a warm pink blusher from Elianto.

I then add Charlotte Tilbury Luxury Pallete Vintage Vamp, using the enhance shade for extra contour in plummy shade.
I used NARS Dual-Intensityin Dione, a pewter which is more wearable than just silver.


If you want to make it last or make pink more stand out, do pink base - with cream blusher or warm pink lipstick like MAC Verve+Twig.


He says the dots is for surrealism and I don't know how to translate that but its very unlikely I wear 3 dots like the original. So I subtitute with blended black accent on lower lashline at the outer corner. I add minimal mascara n softly blended brown line on the upper lasline again on outer corner to follow my natural eye shadow/contour.


We can carry on without the black  if it enough to define eyes with mascara +/- brown liner.


Usually I'll skip black eyeliner if I got striking shadows with striking lips but since I am inspired by Pecheux I still want that black under the eye. If I am bold enough I might just do the dots because overall it is still a well balanced look. However to be honest it is very unlikely... well who knows .


Lips:
Just a deepened plum colour lip and matte out with
dark matte bronzer. I use mac nightmoth
(similar to actual one used) but more matte/
dryer. He used MAC Velvetease in Velvet Teen which has more slip. Then achieve that 'rusty' effect with bronzer.

I add lipstick for more slip for the bronzer and to make it last longer with more packed
colour. I used MAC Hung Up and edges set with MAC  Mineralize Skinfinish Natural in Deep Dark.

That completes the look.

Saturday, 5 November 2016

Review: Nuxe Micellar Cleansing Water

So finally micellar water is getting the attention they deserve! A few years ago we only have heard about Bioderma Micellar and nothing else, but then the micellar storm hit the UK ... everybody use them now!

I thought I share a review one of the micellar water I used.


BRAND CLAIMS:

PURIFYING MICELLAR WATER - GENTLY CLEANSES
For sensitive skin and all skin types.
This purifying micellar water with Rose Petals removes make-up from face, eyes and lips.
A 3-in-1 product, it cleanses, purifies and softens. Leaves skin clean, soft and comfortable.
Contains at least 97.4 % of natural origin ingredients
No parabens. Hypoallergenic fragrance specifically developed for sensitive skin.

INGREDIENTS: AQUA/WATER, ROSA DAMASCENA FLOWER WATER, GLYCERIN, PARFUM/FRAGRANCE, BENZYL ALCOHOL, CAPRYLOYL GLYCINE, CITRIC ACID, COCO-GLUCOSIDE, SODIUM HYDROXIDE, ALLANTOIN, CAPRYLYL/CAPRYL GLUCOSIDE, TETRASODIUM EDTA, DEHYDROACETIC ACID, SODIUM HYALURONATE, LINALOOL [N2305/A].

I think the only ingredient that people going to have an issue with is the parfum. Though generally parfum does not irritates me. I like its short list of ingredients and I also like that it contains Rosa Damascena Flower water as the second ingredients, great for rose lovers!

Personal experience:
Packaging:
Good sturdy plastic bottle in pink... definitely suit being a rose theme range. Good cap and small opening so very little spillage.

Application:
Like a typical makeup remover, splash on cotton pad and swipe across face.
This remove all type of makeup including waterproof mascara. Not just it removes makeup well, it does not sting at all!!
You don't really don't need much to break up your makeup but if you want to really remove everything well that you skip second cleansing, you might need to use more like any other micellar water. 
I generally used micellar for heavy eye makeup or to correct makeup mistake.

Texture and colour:
Unlike typical micellar which look just like water, this actually like amber tinge water.

THE SMELLS!!!
I should have mention this first and foremost, it smell divine!!! Hint of rose but not off putting at all.
If you like rose smelling micellar this would be it.

Overall I give it a 4/5
I would consider repurchasing this but I just got a couple more micellar lotion at the moment.
This is really a lovely product though being NUXE  it is not too cheap.
Especially considering there's rise of micellar in highstreet/ drugstore.
This retail for £14.00 for 200mls.

Saturday, 25 June 2016

Review: Ren Clarimatte Clarifying Toner

So after finishing my Clarins Exfoliating Toner, I am back on my Ren Clarimatte. I can't remember how many bottles of this I went through so I thought this definitely deserve a proper review.


Ren claims

Ingredient for those interested:
Lavandula Angustifolia (Lavender) Flower Water, Salix Nigra (Willow) Bark Extract, Phenoxyethanol, Citrus Medica Limonum (Lemon) Fruit Extract, Sodium Hydroxymethylglycinate, Passiflora Quadrangularis Fruit Extract, Ananas Sativus (Pineapple) Fruit Extract, Vitis Vinifera (Grape) Fruit Extract, Alcohol Denat, Mentha Piperita (Peppermint) Extract, Linalool, Citrus Aurantium Bergamia (Bergamot) Fruit Extract, Potassium Sorbate, Sodium Bisulfite.

At first I was quite confused with how they claim to contain Glycolic acid but it is not written in ingredients. For the record, I bought the first bottle when glycolic acid craze was still recent and I was desperate to get one.
So according to the website which is very informative

Salicilin from Willow Bark gently exfoliates, purifies congested skin, reduces pore size, and is antibacterial
Glycolic Acid from Pineapple Extract, Lactic Acid from Passion Fruit, Citric Acid from Lemon Extract and Tartaric Acid from Grape Extract exfoliate, decongest and remove dead skin cells to renew skin surface"
So after a bit of googling I learnt about sources of glycolic acid other than sugar cane *the most common* which include pineapple and papaya. So Ananas Sativus (Pineapple) fruit extract is the glycolic acid, that make sense.
Is it because it is not synthetic glycolic acid, so they put in pineapple fruit extract instead in the list...
It claims "do not contain 'synthetic' AHA BHA" which to be honest I don't fully understand. They used the term 'bio-extract' but I would imagine other AHA BHA products would come from the similar sources but they still list the actual acids name. I don't know if it just REN marketing style, but I'm not too keen to pry into this and try to define what are synthetic AHA BHA...

While I was trying to figure out where the glycolic acid lies in the ingredient list, I also did a quick google on other ingredients which I don't know, which is not really a good idea...I don't recommend doing that.

It is like basically googling about paracetamol or ibuprofen and you definitely get the information about the side effects on liver,  all the gastric upset, hypersentivity and you could get scared about it for nothing. I've been taking them since childhood... as far as I know I am fine and dandy... 99%people taking this common meds are.

So things like Phenoxyethanol which is dub as an alternatives of parabens, while you can appreciate it's germicidal/antibacterial properties *a plus point for those with wounded skin ie. Scars, popped pimple, eczema etc...* you will get those warning of it may be a skin irritant and those paranoid articles which use the  word 'severe' too frequently. 
I don't deny that there might be someone out there with an allergy to any of the ingredients in any products, you just have to get to know your skin. You would not want to just blindly follow articles/bloggers.

Enough ranting! Sorry about that.
Personally I have no problem at all with this toner...none whatsoever.
It never gives me flares up and any active acnes seem heal/improve at least slightly faster. It is not really a miracle to be honest, but it definitely do not make things worse. 
This is definitely a mild acid toner, suitable for everyday use or good one to start off if you're new to acid toning.

Application:  So refreshing and moist and you don't need a lot! There is no sticky or oily feeling afterward and no dryness.. After months of using just Clarins then finally back to this wonderful stuff from Ren, my skin felt back into it's good momentum, I don't get that weird slippery feel like from Clarins. I felt comfortable and fresh and ready for the rest of the skincare routine. 
I applied with dampen *not soaked* cotton pad after cleansing day and night. On certain days when I I feel I need extra tingle I went for higher acid %.

So for those just starting to get into acid toning, I believe this is a good start.
Only GBP 13.00 for 150 ml and it will last longer than you expected.

Overall Rating - 4.9/5.0
(seriously, you can't go wrong with this. who cares the word 'clarimatte' does not make sense!)


Saturday, 18 June 2016

Simple Midtone Orange Lipstick

I am no good with bright lipstick, but I could not help being attracted to it especially ORANGE believing that I might be able to carry it off. I have searched and searched for the best way to wear orange lipstick, googling for tutorials and celebrities pictures that can inspired me and without looking too dramatic.

Alas, the only way I found best is definitely to keep it simple.
It really depends on your skin tone, the orange you choose and the effect you want.
I want to have that edgy effect of orange in a elegant way.

Inspiration:
after seeing Tessa Thompson, I have sudden urge to wear my orange lipstick more often

I am not really into that ultra sexy bronze goddess look that would be achievable with warm gold bronzy smokey eyes, this look is what most tutorials and celebrities go for . But it is just too much for me, the orange is already bright enough for me. In addition to that, matching clothes and headscarf would be very tricky. You can go bright and light if you're up for it. But I really think the best colour to wear is definitely black like how you love the contrast in girls with dark black hair.

So I am just sharing with you guys how I would wear a midtone orange lipstick especially now that we're in spring/summer.


I opt for a dark brown headscarf instead of black just because of the top I am wearing and that there is no black at all in this outfit. But I tried before with black outfit and it probably match the best.


Base makeup: 
Wear foundation that match your skin and conceal as needed. 

Cheeks:
I definitely avoid blusher even the peachy one. It might look good but just not my style. I just go for bit of bronzers. Contour and sheer highlight as usual. 

EYES:
Just kept the lid bare, with just foundation/concealer or matte skintone eyeshadow.
Then contour slightly on crease and outer corner of the eyes.
I also put a bit of nude liner in waterline and sheer shimmer on inner corner for brightening 
Then the BLACK eyeliners. Go thicker if you want bolder. I definitely think a bit flick at the end compliment this look.

LIPS:
 Lined with orange lipliner followed by a midtone orange lipstick, a bit more toned down orange. I used MAC Mouth Off lipliner and MAC Alibi lipstick. Orange brown like MAC chili without the red. But unfortunately discontinue? or is it just available in certain place, because I think I remember my mum still buys this back in Malaysia, it's her favourite. On her fairer skin it looks like a mature brown orange. On me it can look a bit clownish, hence a bit tricky to wear. Generally orange can look too bright and clownish on me. My orange need some brown in it. 


Sunday, 5 June 2016

Review: Eucerin Anti-Ageing Hyaluron Filler Night Cream

Today I am reviewing a night cream from the brand Eucerin.

Eucerin claims:


Eucerin Hyaluron-Filler Night Cream

Anti-wrinkle night cream with Hyaluronic Acid for all skin types 


An advanced formula night cream to target and plump up even the deepest wrinkles from within.The formula of Eucerin Hyaluron-Filler Night Cream contains two different types of Hyaluronic Acid to target and treat all wrinkle types plus bio-activeGlycine-saponin, to actively increase the skin’s own Hyaluronic acid production. Concentrated Dexpanthenol supports the skin’s overnight regeneration process. Skin feels soft and well cared for.

EUCERIN HYALURON-FILLER

As skin ages, levels of naturally occurring Hyaluronic acid deplete causing surface lines and deeper wrinkles to form.
Each product in the clinically-tested Eucerin Hyaluron-Filler range contains a combination of high and low molecular Hyaluronic Acid as well as bio-active Glycine Saponin, a substance proven to increase the skin’s own Hyaluronic acid synthesis.
If lines and wrinkles are your primary aging concern, the Eucerin Hyaluron-Filler range combines a potent wrinkle-plumping action with excellent skin tolerability.


INGREDIENTS:
AquaGlycerinButyrospermum Parkii Butter,Isopropyl PalmitatePanthenolCaprylic/Capric TriglycerideHydrogenated Coco-Glycerides,OctyldodecanolButylene GlycolGlyceryl Stearate CitrateStearyl AlcoholCetyl AlcoholGlycine Soja Germ ExtractSodium HyaluronateTocopherol,Methyl Methacrylate CrosspolymerAcrylates/C10-30 Alkyl Acrylate CrosspolymerDimethicone,CarbomerCaprylyl GlycolTrisodium EDTA1,2-HexanediolPhenoxyethanolParfum


I gotta say, Eucerin provide one of the most useful website. They explain everything in detail and even include an ingredient dictionary. They also have this detailed list of what cream to use instead of the usual "Are you oily? Normal? or Dry?" :-

So now we don't have to be confused by the variety of product they offer.


This is a very rich night cream that is very suitable for very dry and dehydrated skin.
The reason I bought this in the past despite having oily acne prone skin was because I suddenly start experience dry flaky skin. This was before I use glycolic actively and was on daily BP gel.
The idea of hyaluronic acid for hydration was relatively new to me and I don't even know about the hype on Hyaluron that time.
So I just pick this up without looking into different brands. Unfortunately, looking at the ingredient, this is not the cream if you seeking for a hardcore 'Hyaluronic Acid' product.


Personal experience:

Colour: Off white cream

Texture: Rich and buttery and almost balm like.

I use this at night on top of my usual moisturizer whenever I feel it's not enough.
To be honest I was worry because this is way too creamy to suit my skin type but I admit I love this type of cream. So I always use sparingly to suit my oily skin.
The only issue I am starting to be cautious about now is the shea butter. The texture and smell the cream is definitely 'reeks' shea butter which is top in the ingredient list.
I usually tolerate quite well with shea butter but I think this might contain too much shea butter. And it does not help that I change my other cream with something that contain shea butter as well.
I never got break out from this. There was time I notice one two very tiny whitehead, which I presumed happen when I used too much. But it is not too bad... it is not a full blown pimple as usually by that evening after washing they literally vanish no bleed whatsoever.
After learning about the not so good thing about shea butter I want to be a bit more careful and I think I should avoid using this on the face.

Now having said that, this really felt good on skin, I cannot deny. It smooth out and hydrate all the dry patches and flakyness. 
Foundation just applied so smooth and give a good glow. I love using this when I applied makeup on my friends and when I experimenting with base makeup. 

I can't really comment about the plumping effect, if there is maybe it's not too significant... especially for me which has quite a 'puffy' face and I don't really have lines that too deep.

I still think this is a good product if you have no issue with shea butter and you don't mind the 'grease' look.
There is no problem wearing this even in the day and wear sunscreen on top. You can also use it selectively on areas with dry patches/flake like a skin balm.

Now this does belong a more 'mature' range in Eucerin, so it quite expensive for a drugstore cream... well I think generally Eucerin is quite on pricey side at Boots. So I would leave this cream as a last resort, because I think you might find cream with shea butter+ hyaluronic acid combination with cheaper price tag.

Price: GBP 26.00 for 50 ml

Overall rating : 3.7/5.0

And
 Happy Fasting to all Muslim whose welcoming the Ramadhan!


Saturday, 14 May 2016

Complexion: Contour and highlight (PART 1) plus the un-prettiest sketches lol!

Not trying to be too artistic or what... lol. I'm just bad at drawing... period.
I  recently change something in my contour highlight routine and I thought I want to share it on the blog. But since I don't do videos and I don't have a proper camera, plus not having the best canvas and products to demonstrate this 'technique'... next thing I knew I was sketching on my phone (Samsung Galaxy Note) and I thought, well this is not too bad actually... hahaa!

In the 'old' days, contouring seems to associate to 'shaving off' a few pounds' and it does make sense,  since it give that chiseled effect, but it is more than that. You might think of this technique as a 'face changer' or making a 'dramatic statement' but I see it as a technique to bring your 'natural face' back. 

It's all about having dimension.

When we started wearing powder, then upgraded to higher coverage base like foundation and concealer, notice that that 'bland, flat' effect? If you're a malay, you probably familiar with the term 'muka tepung gomak'. 

Imagine putting your face with the same colour all over, however thin it may be, without any dimension, it will look flat and obviously made up despite going 'natural' sans blush, lipcolour and eye makeup. This problem maybe more common among guys as they don't really put colours in the face and those with darker skintone as the natural shadow would be less  obvious compare to those with fairer skintone...this also work the reverse way as well as natural highlight would look less obvious on fairer skintone.
While in the past this technique usually reserved for the professional, now after becoming a trend a couple years back, there are more information and more products available. Look at all the brands racing to bring out the ultimate "CONTOUR KIT".

For those who is not familiar, basically CONTOUR is putting 'shadow' (darker colour) on the 'trough' or 'depression' of the face, bringing those part 'down and in'. 
HIGHLIGHT is putting 'light' (brighter colour) on the 'peak' or the 'high-planes' of the face, bringing those part 'up and out'
If you study your face, you can actually determine these parts yourself. But if not, you could use the guide I provide below.
with only foundation on and some lipcolour. Look at the'natural' shadow where I outline
This is how I typically contour and highlight. It does not take too long after you get used to them.
The sketch below sums it up a bit more.
LOL... this sketch is too much... 


I have a darker skintone, so my natural shadow may not be too obvious. In addition to that, I have wide cheeks with baby fat, so base makeup like foundation can easily knock-out the natural shadow on my face making it look more 'made up'/unnatural. So contour bring back the natural shadow and highlighting is accentuating the 'structure' and again, dimension of the my face.

General tips on products:

CONTOUR
  • Strictly MATTE product so it does not catch the light hence give the opposite effect
  • Generally use a product few shade darker than skin tone
  • While bronzer even some blusher is generally 'acceptable' as contour product but the most ideal contour product would be a more cool BROWN with a 'GREY' undertone (how dark depends on your skintone)
HIGHLIGHT
  • Use both MATTE and SHIMMER with the shimmery product only on a few points. Shimmer/sheen/glow... all these catches the light, and bring up those structures. 
  • Glitter is fine generally but may be too unnatural and over the top. Avoid the chunky ones.
  • Generally use a product a few shade lighter than skin tone.
My usual routine...
CONTOUR:-
  • Hollow of the cheeks
  • Under jawline
  • Side of the nose
  • Outer corner of the eyes
  • Under the lips 

 HIGHLIGHT:-
  • Under the eyes
  • Bridge to tip of the nose
  • Forehead
  • Chin 
  • In addition to that, I add shimmery highlight but only on cheek bone and bridge of the nose, sparing the tip.
There are still more areas that you could contour and highlight, it really depend on how much effect you are looking for and you face shape as well ie. long face verse round face etc...

Hope that the sketches below explains more.
There is two type of highlighting product to use, matte and shimmery. Use either or use both. It is really up to you.
Matte highlight is less risky than shimmery highlight, as shimmer product could make you look a bit shiny, oily and like a disco ball. If you hate that don't do it. If you like that, and skin is dry, go nuts... but I personally keep the shimmery at key points. 
Now highlighting nose, it use to be just on the bridge of the nose, but I can't deny there is a trend which include highlighting with shimmer on the tip of nose... I guess if it works... continue on. 
I did watched Wayne Goss on youtube commenting on this, kinda funny...
The classic technique of highlighting with shimmery product is to apply in "C" shape from the brow bone to the cheekbone. Even if you don't do the whole shabang, just use this technique and it still make a different. This is the first technique I actually introduce in my routine.


The classic technique for contour is to apply in '3' shape which start from temple to hollow of cheeks and to under the jawline... or you could make it a three C shape by extending from outer forhead. 
Like I mention stick to matte product... shimmer catches light therefore it highlights (the opposite effect of contour). Only those with very prominent hollows in their face could get a way with shimmery contour, because with deeper hollows it is more difficult to catch light. 
Now the risk of over-contouring. Imagine just having a bland foundation then contour with grey tone brown... it potentially make you look 'sick' or harsh... 
So a great tip is to blend contour with bronzer or even you blush. This is great as it soften the grayness from the contour and give healthy look to your complexion. 

Now if you notice in the sketches, HIGHLIGHT is mostly done in CENTRE of the face as that is where it 'bulges' out and CONTOUR is mostly done at the OUTLINE of the face. 
If you are familiar with with 'Korean style' makeup, they basically follow this rule. Instead of the typical shadowing in the hollow of the cheeks, they prefer to 'shave' off the jawline and put shadow on the outline the face. These steps basically to fulfill their beauty 'standard of having a 'small face' and a 'V' line jaw. 

So like I mention earlier it really depends on what you are trying to achieve. Like myself I'm just trying to get back that dimension and give structured look to my face. It's not just about looking 'thinner'. 


Not all of us have the same face shape, and depends on how much and type of products used, contour and highlight can have a subtle or major effect on how your face shape appears ie. natural vs 'Maleficient' like sharp cheeks.
I just also have to share this article by Beauty Editor on Nick Barose. We got to admit contour and highlight has gone a bit too far and it sort blurred the line between reality and filters, practicality and long winded routine... my thoughts really resonate with what Nick Barose was saying on beauty greed. 
This sound cliche but it needs to get out there. 
In PART 2, I will explain about products to use including the product I used in my routine.